Revit Tutorials ,Revit libraries, Revit rendering,Bim revit, Headline Animator

Check this out


Autodesk Revit Tutorial Headlines

Sunday, November 20, 2011

Autodesk Revit MEP 2012 Win32 & Win64


Autodesk Revit MEP 2012 Win32 & Win64 | 2.67 GB

Autodesk® Revit® MEP Building Information Modeling (BIM) software for mechanical, electrical, and plumbing (MEP) engineers supports more accurate and efficient building systems design projects from concept through construction.

Features:

* Design building systems more accurately using coordinated, consistent information inherent in the intelligent Revit MEP model.
* Analyze for efficiency with integrated analysis earlier in the process.
* Keep documentation coordinated and consistent with parametric change management technology.
* Deliver 3D models and documentation to support the building lifecycle.

AutoDesk Revit Architecture 2012 Win32 & Win64


AutoDesk Revit Architecture 2012 Win32 & Win64 | 2.77 GB

Autodesk Revit Architecture building design software works the way architects and designers think, so you can develop higher-quality, more accurate architectural designs. Built for Building Information Modeling (BIM), Autodesk Revit Architecture helps you capture and analyze concepts and maintain your vision through design, documentation, and construction. Make more informed decisions with information-rich models to support sustainable design, construction planning, and fabrication. Automatic updates keep your designs and documentation coordinated and more reliable.

Revit 2012 – Workplane Viewer

The Workplane first appeared in the Revit 2011, but was restricted to the conceptual massing environment only. Fortunately, for UI consistency & to help improve your workflow, Autodesk have made the Workplane Viewer available in the normal Revit modelling environment as well as the family editor. The Workplane Viewer is a temporary view which opens as a separate floating window to allow you to edit selected elements.The viewer displays elements from the selected Workplane making the editing of items easier, rather than having to fight your way through the project browser to find the appropriate view. It should be noted that the Workplane viewer is totally separate to the project browser.
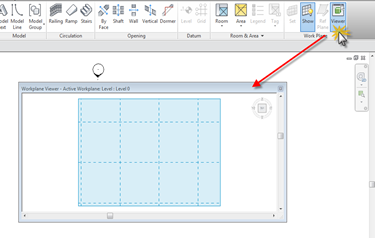
To enable the Workplane Viewer, go to the home tab & find the Workplane tools, then locate the Viewer icon.
image
Clicking the Viewer icon will open up the Workplane floating window. This can be resized & repositioned as required.
image
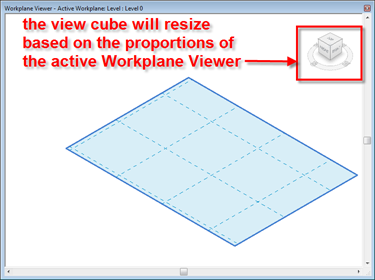
When the Workplane viewer is opened, it will display the active Workplane. You will noticed you have a “view cube” icon in the top right corner. By clicking on this you can orient to different views of the active Workplane without disrupting the view you are working on in the active Revit window.
image
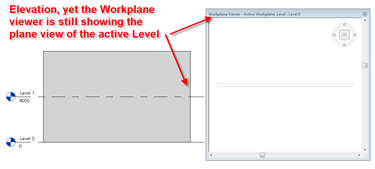
If you change to a different view in the main Revit canvas, say from a plan to an elevation, the Workplane Viewer does not automatically follow & update its view so they correspond.
image
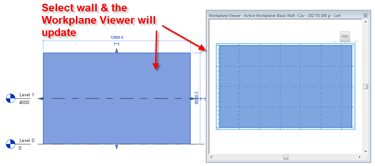
However, if you choose to edit a wall profile in an elevation view, as soon as you select the wall, the Workplane Viewer will indeed follow & the Viewer will update to display the active or selected plane.
image
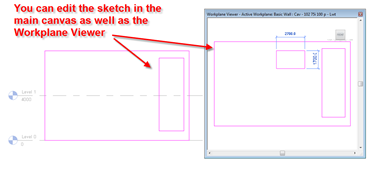
Choosing to edit the wall profile will obviously enable the sketch mode. The nice thing here is that you can also edit the sketch in the Workplane Viewer.
image
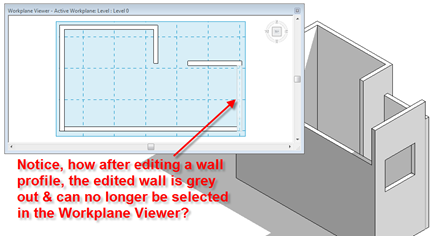
A point to watch; if you decide to edit a wall profile; before editing the wall, it will display as a element which can be selected in the Workplane Viewer.
imageRefer to the image below, see how the item can be selected…..imageNow, if you decide to edit the wall profile, you will notice once you have edited the wall you can no longer select from the Workplane Viewer as its greyed out. I am not sure if this is “as design”, but its one to watch out for.
image

Image composition – Revit & Vasari

ambient
2am
final composition
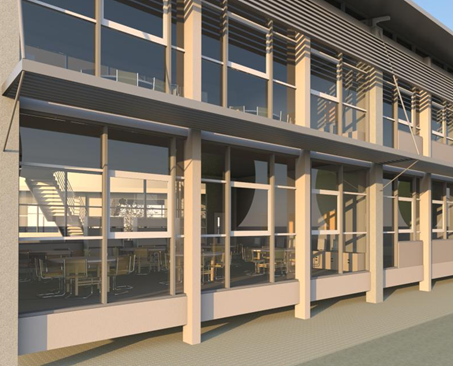
I’m not even going to attempt to take credit for this, but at the recent Excitech Revit forum, Paul Grimston, one of Excitech technical consultants, showed how to use rendering in Revit & Photoshop to create some incredibly compelling renderings. Its nothing I hadn’t seen in the past, but the using of ambient occlusion was very interesting. Be sure to checkout the download pdf for the Revit Architecture forum which explains a bit more.

Project Neon – Revit 2012 cloud rendering awesome!!!!!

image
Be sure to check out Project Neon for Revit 2012.
http://neon.labs.autodesk.com/index.aspx
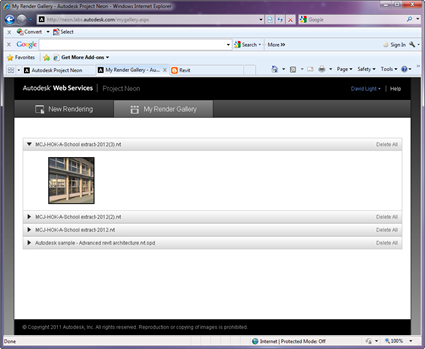
Project Neon has recently been updated to allow you to do cloud based rendering from Revit 2012. Just sign up, download & install the Revit 2012 plugin & you are good to go! I threw a couple of render at the system today & I am very impressed. It will even notify you once you render is complete!
image
Once the plugin is installed, you will find another tab which allows you to publish your render online or to view your render gallery.
image
The images can be rendered using all the normal settings with Revit. You simply click the “render online” button, pick your 3d view you want, set the image quality, then the image size, followed by the File format. You have three file formats to choose from PNG, JPG & TIF ; then just hit the “Start Rendering” button.
image
Your file is the published to the cloud where a host of super computers rip through the render in no time at all. Once the render is complete, you are alerted via email. Login to Project Neon & you can view & download your completed render from there. You will need to set up the exposure settings on your host workstation before hand but that's a small price to pay for the speed of rendering. Be sure to give it a go! This is genuinely an exciting development for the Revit user & harness the essence of cloud based computing.
image

Revit 2012 - Reporting Parameters in CW Panels - By David Light

I must admit, I don’t why I hadn’t picked up on this one before, but at RTC USA there was an interesting discussion that took place as well as being highlighted by Harlan Brumms in his class on solving common Autodesk Revit Architecture problems on using reporting parameters in curtain wall panel families.
This got me thinking, if reporting parameters can indeed be used in curtain wall panel families, they should be able to drive the depth of panels. If you can report the width & height of a panel, this will provide you with an area value. This could then be used in conditional formula which will parametrically alter the overall depth of individual panels.
For this exercise I started with a curtain wall panel.rft
image
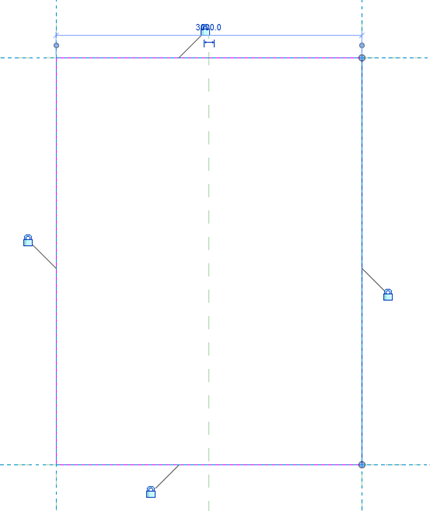
Next I drew a very simple extrusion in the front elevation plan & locked the extrusion sketch to the reference planes.
image
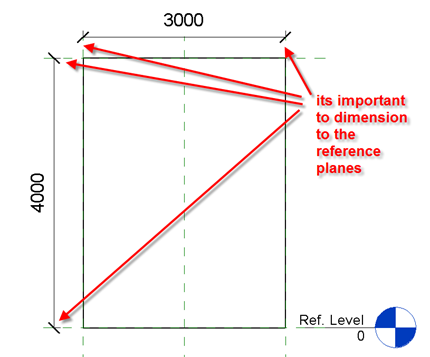
I then dimensioned the vertical & horizontal reference plans. Its important you dimensions the reference plans & not the level embedded in the family.
image
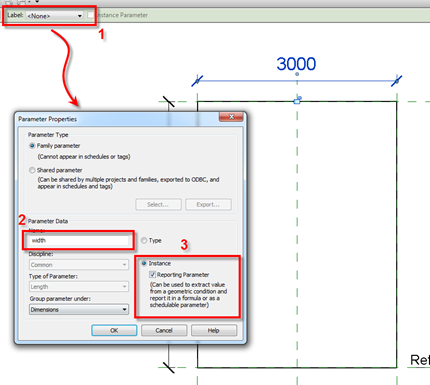
Then select the horizontal dimension you just created & pick the label feature to turn the dimension into a parameter. Name the parameter to something like “width”, set it to an instance parameter & ensure you check the Report Parameter radio button.
image
Repeat what you did for the width parameter, turning the vertical dimension into a reporting parameter labelled as “height”.
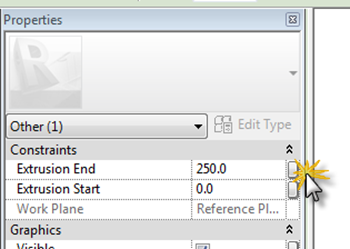
Go to the Ref. Level view, select the extrusion; in the Properties Palette, locate the Extrusion End parameter, hit the Associate Family Parameter button.
image
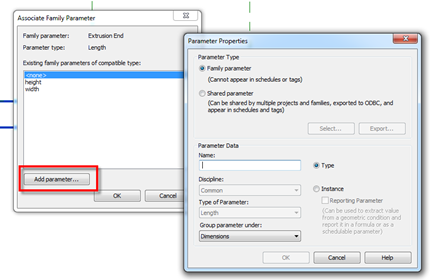
This will open up the Associate Family Parameter dialogue box. Hit the Add parameter button & create a new instance parameter called “depth”. This doesn’t need to be a reporting parameter.image
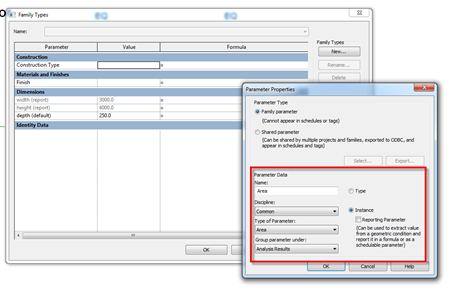
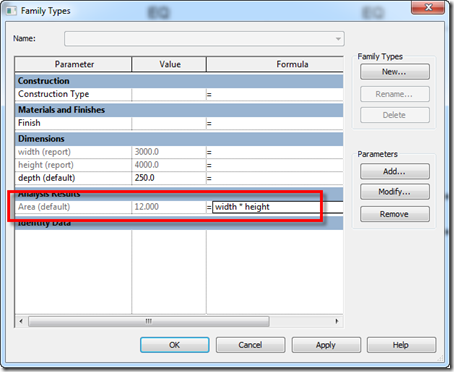
Go to the Family Types dialogue & create a new Area parameter as a instance.image
Go back to the Family Types dialogue box & do the following; in the formula for the Area parameter we will multiply the width X height to give us our Area.
image
Next we will add a conditional formula to the depth parameter. So we will use this formula as a test example.
if(area < 4 m², 1200 mm, if(area < 6 m², 600 mm, 100 mm))
What this conditional parameter will do formula is allow the depth of the panel to change based on the resulting area value of the panel. If is less the 4m squared it will be 1200mm thick, less the 6m & it will be 600mm, else it will be 100mm thick,
image
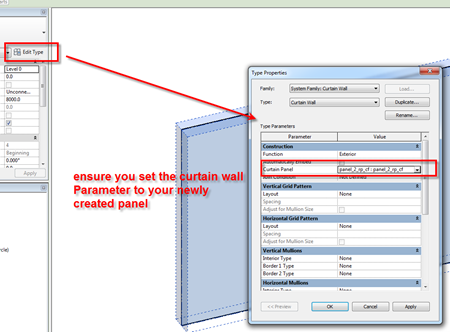
Next save your panel family with a suitable name. Start a new project, load your newly created panel family into the new project. Using the wall tool draw a straight segment of curtain wall. With the curtain wall selected, go to the Properties Palette, pick the Edit Type button, this will open up the Types Dialogue box for the Curtain Wall.
image
Set the Curtain Panel to your new loaded curtain wall panel. The cw system will automatically file with the new panel. Finally, using the Curtain Grid tool, start to divide up the curtain wall.
image
As you divide the curtain wall, depending on the panel size, the area of the panel will be calculated in turn informing the depth of the panels.
image
image

The values I added to the conditional formula are not cast in stone, you can easily modify them to get different results or even make a more complex conditional formula. I have quickly knocked up a youTube Video which supports the above workflow, although I don’t follow it from start to finish, but it should reinforce what I did.


Creating Elliptical Walls In Revit in 2012 by Posted by Phil Read


Here's one way to get around making a series of walls in Revit that come Pretty Darn Close (TM) to being elliptical. But first, you need to take a moment and watch David Light's version:


What's deceptive about this (for those of you that don't know David) is that David has a foreign accent. This gives him a voice of certainty and moral authority that is unquestionable. I (on the other hand) have no such advantage. My accent is an annoying twang that starts in New Jersey and finishes in Charlotte, NC. And I talk to fast when I get excited.

That being said, I think I've figured out this solution. But rather than subject (get it..."subject"...as in British subject...as in USA=1, Britain=0...oh never mind) you to my voice, I've added a sound track courtesy of the FLAT TIRES:


Revit 2012 – massing & voids by David Light

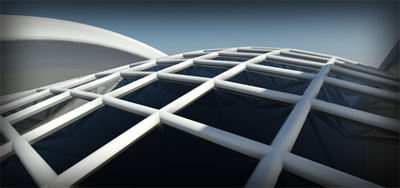
This may seem rather obvious to the seasoned Revit user; but for the new kids on the block, when using voids to cut massing geometry in Revit, sometimes you need to think a little differently. The process of using voids to cut geometry can be a bit confusing. This is especially so, since the way voids cut in the conceptual massing tools is a little different compared with voids in say the in-place editor or family editor.. For instance, take a look at the image below. This was created by generating a freeform surface using the massing tools….then roof by face to generate the actual geometry for the roof.…it looks reasonably straight forward to achieve, but you need more then two voids to cut the initial massing surface.
image
Let me explain in more detail….. image
So the surface was created using the massing tool, which consisted of a series of spline reference lines, then a surface generated between the reference lines. As indicated below.
image
Next up, a inner boundary & a outer boundary of reference lines where sketched. These will be used to form the voids which will cut the surface.
image
Now the natural logic here is to also create a large rectangle to go beyond the surface, like this…..
image
However, this is not going to work for us, because if you try & build the void, from the rectangle & trimming reference lines you are going to get the dreaded “Unable to create form element error”.
image
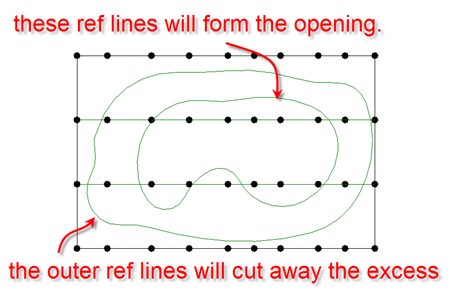
Instead, you need to create two voids from reference lines to cut away the excess surface. With a reference lines configuration like this.
image
The image below, hopefully explains it a little better.image
All we then need is to create a void from the inner reference lines to cut the opening & we are good to go.
image
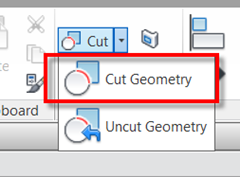
You may need to use the Cut Geometry tool to force the cutting.
image
image
I hope the above makes sense, I guess I should really do a youtube video to explain it in more detail, but this should at least give you some useful guidance.

Revit Architecture 2012 - Custom Pool and then Rendered

Custom Revit Family Pool for a House in Belize

Revit Architecture 2012 - Tutorial 09

Basic Editing Commands


Revit Architecture 2012 tutorial - Walls Advanced 2

Downloadable Content This Tutorial will go through Walls at a advanced Level: Locking layers, Disallowing joint and allowing joint, Wall by Face, Stacked walls


Revit Architecture 2012 Tutorial - Floors

Downloadable Content This tutorial will go through all the ways to create floors and more: Creating floors, Raft foundation, slope in floor

Revit Architecture 2012 Tutorial - Model In-Place

ownloadable Content This Tutorial will go through model in-place at a advanced Level: Extrusion, sweeps, planes, setting plane

Revit Architecture - Getting Started, Revit Interface Part 1

Revit Architecture 2012 tutorial - Walls Advanced 1

Downloadable Content This Tutorial will go through Walls advanced: Sweeps, Reveals, Split Walls, Wall Profile, Modify walls, Layers, Function, material, thickness, wraps, window wrap and join

Revit Architecture 2012 tutorial - Template File Part 1

Downloadable Content This Tutorial will go through what is need to create a good template file. Part 1 will go through : Levels, Window & Door Tag, Fill Pattern, .Pat File, Word Pad, Object Styles, Visibility Graphics, Over Ride, Arrow Heads and Text.